

HH Floor Installguide
Before the installation
Please read the instructions carefully and operate according to the chapter before starting the installation work.
Warm Reminders
After installation, Dust-mop or vacuum your floor to remove any dirt or debris. Post installation temperature should be maintained between 60-80℉ and relative humidity of 30-50%.
Planning the Job:
• First, determine how you want the flooring to run. Typically for plank products, the flooring runs the length of the room. There may be exceptions since it is a matter of preference.
• To avoid narrow plank widths or short plank lengths near the walls/doors, it is important to do some pre-planning. Using the width of the room, calculate how many full boards will fit into the area and how much space remains that will need to be covered by partial planks.
• Lay the first row of planks along a chalk line and trim to fit the wall allowing ¼ inch expansion space. If you start the first row with a full width plank, it will be necessary to trim the tongues next to the wall and then place the cut edge next to the wall. Use a utility knife and a straight edge to score the top surface of the plank and then bend it downward to separate. If the starting wall is out of square, it will be necessary to scribe the first row to match the wall, allowing the opposite side of the row to present a true square base for the rest of the floor. • Use expansion gap spacers to keep the floor about ¼ inch away from the walls. You need to maintain a ¼ inch gap around all vertical obstructions including cabinetry.
• Remove wall base and undercut door jambs. Do not secure individual planks to the subfloor as it is designed to be a floating floor. Do not install cabinets on top of floor. Transition mouldings cannot be tight to the floor but allow the floor move beneath them.
-
Installation Tools

In the installation
-
 01 —
01 —Begin the installation working from left to right. Insert the Spacers at the ends and edges where planks meet wallBegin the installation working from left to right. Insert the Spacers at the ends and edges where planks meet wall.
-
 02 —
02 —Lock short end of plank by inserting tongue into groove at an angle and drop in place Continue to the end of the first row.
-
 03 —
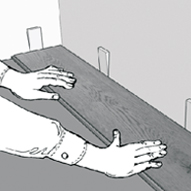
03 —Use leftover plank from first row as starter for second row working from left to right.
-
 04 —
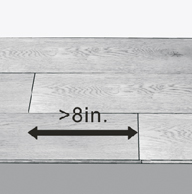
04 —There must be at least 8" between plank end joints on adjacent rows.
-
 05 —
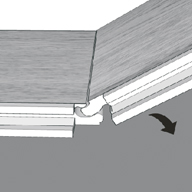
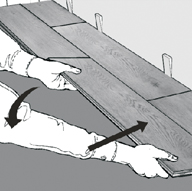
05 —Lock long edge of plank by inserting tongue into groove at an angle and drop in place. Slide plank toward end of previously installed plank until the tongue just touches the groove.
-
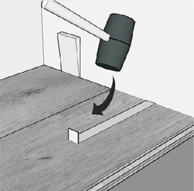
 06 —
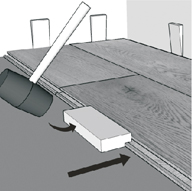
06 —IMPORTANT! Use rubber mallet and tapping block to tap long edge of plank to ensure a tight fit. ANY GAPPING CAN COMPROMISE THE LOCKING SYSTEM!
-
 07 —
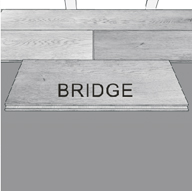
07 —Attach a scrap piece of floor to bridge gap between ends of planks.
-
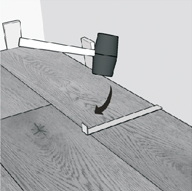
 08 —
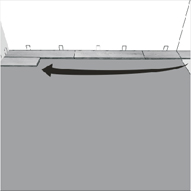
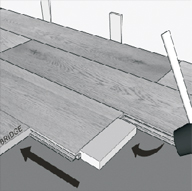
08 —Tap end of plank with rubber mallet and tapping block to lock ends of planks together. Remove bridge and continue towards wall until installing the final plank in the row. Be sure to tap on edge if vinyl so as not to damage locking profile.
-
 09 —
09 —Use rubber mallet and pull bar to lock final piece in row. Insert spacer at end of row. Continue installation to final row.
-
 10 —
10 —Use rubber mallet and pull bar to lock long edges of planks on final row.